The Anglo-Scottish War 1482
Invasion
by Sandra Pendlington
In Scotland, James III had money problems and in 1480 he introduced ‘black money’ – debased currency made of inferior metal. Because the coins were often not accepted, the people were unable to buy food and hunger became a major problem by 1482. In 1482 the principal noblemen in Scotland complained to James about this and his preference for taking counsel from ‘unworthy vile persons’ (‘the common favourites’).]
As well as problems with his nobility, James also had family problems. Towards the end of 1479 James III had imprisoned his youngest brother James, Earl of Mar, for treason. Mar subsequently died in suspicious circumstances in prison and James was accused of ordering his murder. His other brother, Alexander, Duke of Albany, was also accused of treason and, possibly knowing what had happened to Mar, escaped to Paris. His Stewart half uncles also resented James’s actions. Scotland was divided into factions for and against the King and in France Albany was fomenting trouble. The war with England had paused but James knew that it would break out again after the raiding over the winter and a large invasion was expected.
Short of arms and expecting an English invasion, James had written several times to Louis XI of France asking for assistance against their common enemy England. Louis had not replied. So after the March 1482 meeting of the Scottish parliament, King and parliament decided to send an embassy to Louis XI of France to ask for help. Four commissioners departed for Paris to meet with Louis. At least two of the commissioners, the Earl of Angus and James III’s half-uncle James Stewart, Earl of Buchan, were supporters of Albany.
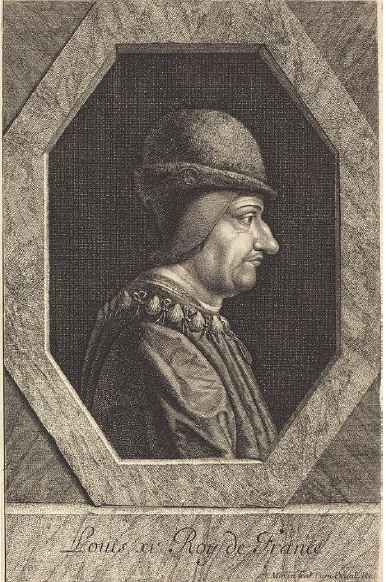
Louis XI (in public domain: Jean Morin, Metropolitan Museum of Art).

James III (in public domain: National Portrait Gallery).
April-June 1482: Alexander, Duke of Albany and the Treaty of Fotheringhay
Macdougall gives the background to this event (p 191), which Tanner calls an astonishing and complex treason by Albany against his brother James III. The Scottish commissioners arrived in Paris and talks with Louis took place. Louis possibly wanted the Scots to attack England so that Edward IV would be too busy with the Scots to attack France. The Scots wanted artillery. The outcome of those talks is not known. Macdougall quotes the Scottish chronicler Adam Abell said that the commissioners also met Albany. Abell lived in Jedburgh, the home of the Earl of Angus, and his information is likely to be true. Abell suggested that the commissioners used James III’s embassy to see Albany and finalise plans to remove James III from the throne. Albany would travel to England to persuade Edward IV to invade Scotland and use the English army to make him King of Scots. This probably suited Louis. Macdougall also points out that the commissioners had attended the March parliament where the Scottish defensive measures were agreed, and that two of them, Angus and Buchan, were wardens of the East and Middle Marches where an invasion was expected. This would mean that the English could be given information about the defensive preparations prior to invasion and would be invading ‘friendly territory’ with Albany’s supporters providing information to the English commander.
The commissioners returned to Scotland and Albany arrived in England from France in late April 1482 to discuss the plan. It is doubtful how well informed Albany was about the exact political situation in Scotland. James III had many problems with is nobility, but it may be that the commissioners gave Albany an exaggerated opinion of his support. By 2nd May, Albany was lodging in London at Edward IV’s expense and the two men were discussing a new plan for the invasion. The English army would be used to make Albany King of Scots. In return for the assistance of the English army, Albany would become a puppet King of Scots under Edward IV, who summoned fighting-men for the cause of the ‘King of Scotland’ (Albany) on 10th May.
Edward IV and Albany moved to Fotheringhay Castle in Northamptonshire, where the details of the far-reaching treaty were thrashed out. Albany promised to do homage and fealty to Edward as his feudal lord, to end the treaties between Scotland and France, thus breaking the ‘auld alliance’ and removing the threat on the Marches, and to surrender Berwick-upon-Tweed and lands in Dumfriesshire – Lochmaben Castle, Annandale, Eskdale, Ewsdale and Liddesdale – to Edward. The agreement was to be cemented by the marriage of Albany and Princess Cecily, the young daughter of Edward IV, who had been the intended bride of the heir of James III, if Albany could free himself from his marriage to Anne de la Tour.
On 10th June 1482, the Treaty of Fotheringhay was signed by Edward IV and Albany (who signed as ‘Alexander R’) in the presence of Richard, who had arrived after the raid on Dumfries. Richard had been responsible for the preparations for invasion in the north but Edward IV, a renowned warrior King, was expected to lead the army. Unexpectedly, the day after the Treaty was signed, Edward IV instructed Richard to lead the army. We do not know the reason why Edward IV changed the plan, but Richard had a reputation as a good general, knew the terrain and was obviously trusted by Edward to carry out the work successfully.
The English army moves north
With the invasion now imminent, England’s nobility led their men of arms northwards to Alnwick. Through the towns and villages, the noise of the carts bringing the arms and equipment, the clatter of hooves and the colour of the standards filled the streets and country lanes that summer. The Queen’s brother Sir Edward Woodville was one and Richard’s friend Francis Lovell another. Thomas, Lord Stanley, who would lead one division of the army, brought his 4,000 renowned archers from Cheshire. The nobility of the north brought their men to fight the Scots – men like Lord Scrope from North Yorkshire and Sir James Harrington from Lancashire. Among the northerners were two experienced Yorkshire commanders, Sir John Neville of Liversedge near Wakefield and Richard, Lord Fitzhugh, from Ravensworth, near Richmond. Both had been on the 1480 raid and were to lead divisions of the army in the coming invasion. Also with the army was England’s senior herald, John Writhe, Garter King of Arms. In medieval times the heralds’ traditional role was to carry messages from his army commander to the enemy commander. The army also included at least one Scot, Alexander Jardine from Dumfriesshire, who was a supporter of Albany. It was not just an English army. Edward IV had hired mercenaries from Europe – the first time that foreign troops had been recruited to fight for an English King against the Scots. Cunningham (using notes made at the time by an official, Richard Butler) says that at least 1800 Burgundian, German and Swiss soldiers landed at Southampton and London and then marched north to join the English army. They were professional soldiers – mercenaries who served whatever king needed men to fight. Dressed in white jackets with the red cross of St George given to them by Edward IV, they brought with them hundreds of gunners and ordinance experts and marched in companies with their own standard bearers and drummers.
Except for Fitzhugh’s division, which remained in readiness at Newcastle-upon-Tyne, the army converged on Alnwick where Henry Percy had mustered his men. Artillery, including canon and the new ‘handgonnes’, was shipped from the Tower of London to Newcastle from where it was hauled 35 miles up the coastal road to Alnwick by 120 draft horses.
Richard and Albany left Fotheringhay and the York Records documents their arrival at York on 15th June where they were presented with gifts of wine, fish and bread by the city councillors. The men of York under the command of John Brackenbury, mustered just outside the city boundary at 6am on 15th July and he record says that they went ‘with my lord of Gloucester’. The journey to Alnwick would have taken two days.
As the English moved north, James III called for Scots to gather. By 8th July, men from northern Scotland were gathering on the Burgh Muir in Edinburgh and men from the south were marching to their traditional Scottish muster location at Lauder, 24 miles south of Edinburgh.
The scene was set for invasion and battle.

Alnwick Castle Gate (S Mannonen)
July 1482: Invasion
The major source for the invasion is Edward Hall’s Chronicle. It was first published in 1548 almost 70 years after the invasion took place. Hall may have written it sometime before but, even so, it is not a contemporary document. However, the details in the account indicate that Hall had access either to an original document or spoke to men who were there. Hall documents the size and divisions of the army, names some commanders who were there and settlements that were allegedly burnt. From these details it is possible to deduce many aspects of the invasion. However, some things are not certain so alternative possibilities have to be considered.
The size of the Armies
Hall gives the size of the English army as 22,500 men including 1000 men handling the artillery. Historians believe that the money made available for the invasion was sufficient to keep an army of 20,000 men on campaign for 28 days, enough time for an invasion of southeast Scotland and fighting a battle close to the border to take the Scottish throne for Albany. The Scottish army was probably smaller but by how much is not known. In Scotland, men conscripted for the Scottish army were unpaid for 40 days and the men were allowed to keep a share of the plunder they had gained. There are therefore no wage figures for the Scottish army to compare with those paid to the English army.
Routes into Scotland
The Scots had been expecting an invasion since the previous year, so surprise was essential and that meant that the English army had to move quickly across the border and into position to fight the Scots.
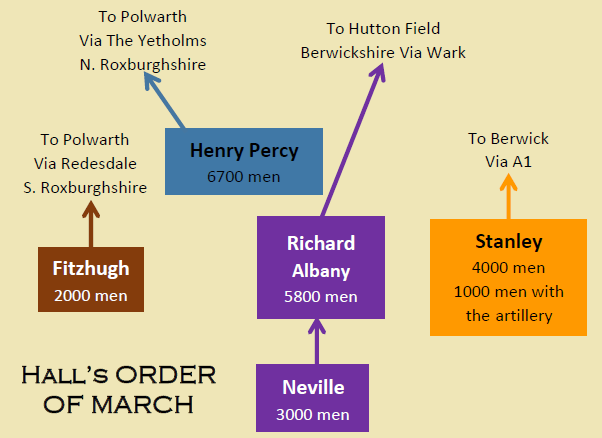
Hall’s Order of March (S Pendlington)
With our modern roads, it is difficult to imagine what travel was like in 1482. The major obstacle for armies travelling between England and Scotland was the river Tweed. The only bridge was at Berwick too narrow for a large army and strategically too far east. In open ground the Tweed and other watercourses had to be forded. This was a fast-moving army so major towns such as Kelso had to be by-passed.
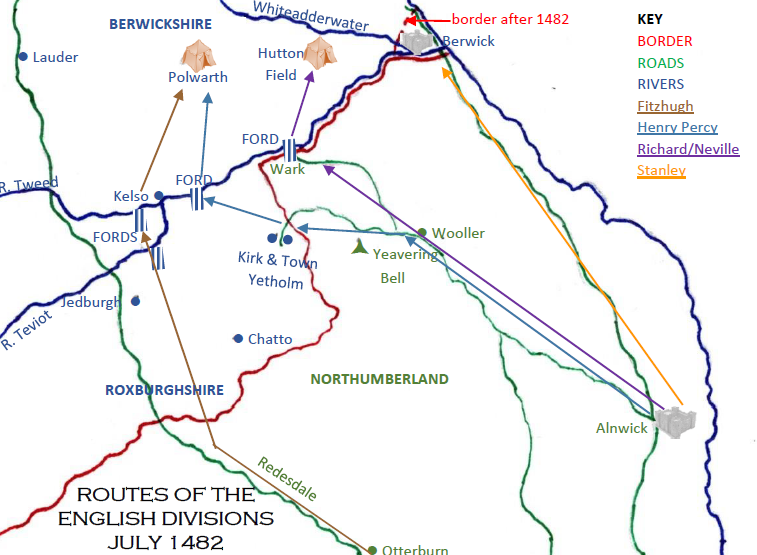
Routes of the English divisions in July 1482
Historians have different views on the routes taken by the English army. Did the army stay together, or did they cross the border in different places? Most historians say that the whole army went to Berwick using the Great North Road (A1) but this is based on an assumption that the army used the coast road to reach Edinburgh. Historian Michael Hicks, who says that the army crossed the border in separate divisions, is an exception. It does not seem possible for an entire army of 22,500 men and artillery to move quickly using the same road and, as we shall see, the army did not use the coastal road to Edinburgh. History shows that in the past different routes were used by armies to avoid Berwick. For example, Scots who survived the Battle of Otterburn in 1388 used an old drover road to get home and the Scottish army used the Wark fords when they went to Flodden. In addition, the 1480 raid had given Richard and Henry Percy a chance to look at the lie of the land. The routes they used then worked and there was no reason why they would not work again.
Hall describes the march of the English into Scotland in three columns (often called ‘battles’). The centre column consisted of Henry Percy’s division, followed by Richard’s division, followed by Neville’s division as rearguard. Stanley’s division was on the right flank. Fitzhugh’s division had the most difficult task – they were on the extreme left guarding the vulnerable western flank.
The map shows the result of the Scottish Branch research into the routes. From east to west, Stanley’s division with the artillery are on the right flank travelling up the Great North Road to Berwick-upon-Tweed. Richard’s division, followed by Neville’s division, used the 1480 raid route into Berwickshire, crossing the Tweed at the Wark fords and camping at Hutton Field (see research notes 4 and 5).
Henry Percy’s division turned off just north of Wooller to cross the border into central Roxburghshire at Kirk and Town Yetholm. Then instead of going to Jedburgh as they had done in 1480, they turned north and crossed the Tweed at the Sprouston fords before making their final camp at Polwarth (see research notes 4 and 5).
Fitzhugh’s division, guarding the crucial west flank, rode from Newcastle to Otterburn. They then travelled north through Redesdale on the old drover road to cross the border into south Roxburghshire. From there they travelled north, fording the River Teviot at the Nisbets and the River Tweed west of Kelso, before joining Henry Percy at Polwarth (see research note 6).
Timing was crucial – the army had to cross the border at the same time to achieve surprise and it was over 40 miles from Stanley’s division in the east to Fitzhugh’s division in the west. The only way that could happen was to manoeuvre the divisions close to the border the night before, so that they all crossed the border at dawn. Looking at a possible timeline, the date of the invasion was probably 19th July. Fitzhugh, who had further to go, probably left Newcastle on 17th July, camped overnight at Otterburn and moved into position in Redesdale on the 18th. The other divisions moved north on the 18th – Stanley to just south of Berwick, Richard and Neville to just south of Wark and Henry Percy in the Bowmont Valley. At dawn the next day, Stanley’s division appeared before Berwick and the other divisions rode across the border.
Stanley's division at Berwick-upon-Tweed
Berwick had been in Scottish hands since the Lancastrians handed it over in 1461 in return for Scottish help to take back the English throne. Recapturing Berwick was a major objective for the English army in 1482.
The plan to the side shows the strong defences of Berwick. The town is walled and moated, and the castle is separate from the town (bottom left). The old bridge leads to the single gate on the south side.
Hall said that the army did not sleep on the march to Berwick and that the Scots were taken by surprise by the sudden arrival of the army: ‘they came sodainly by the water side to the toune of Berwicke, and there, what with force, and what with feare of so great an armie, take and entered the toune.’ King Edward IV wrote in a letter to the Pope in August 1482 that ‘a small chosen band…received the surrender of the town immediately on sitting down before it, though the same was entirely surrounded by impregnable walls.’
So why, when confronted with Stanley’s 4000 men, were the gates of Berwick opened to the English? Macdougall provides a possible explanation. He believes that the surrender of Berwick town (not the castle which held out) was due to a pre-arranged plan made by Edward IV, Albany and a Scottish nobleman called Andrew, Lord Grey, who was one of the commanders in Berwick. Grey was involved with Albany in treason against James III in February 1483 and Macdougall suggests that a similar thing happened in 1482, Grey arranged for the gates to be opened to Stanley and his men, who occupied the town and laid siege to the castle, which was held by men loyal to James III. Hall records that Stanley’s division remained at Berwick to lay siege to Berwick Castle with the artillery.

Plan of Berwick (in public domain: Newcastle University)
The central and western divisions & Hall's list of 'burnings'
After crossing the border these divisions moved swiftly through Berwickshire and Roxburghshire to their campsites. Hall gives a list of 64 Scottish settlements that were ‘burnt’ by the English, some of which are difficult to transcribe and locate on maps. This conundrum of where the settlements were was not fully solved until the 21st century by Scottish Branch historian, the late Patricia F Payne. She lived in the area and identified all 64 settlements for the first time. Her local knowledge of the dialect and history of the area was essential in identifying the settlements that existed in 1482 and those whose names have changed. Then Patricia and Sandra Pendlington, searching large scale Ordinance Survey maps that contained details of old routes and gave positions of bastilles, confirmed the locations of the settlements. When the locations of the 64 settlements were plotted on maps, the routes of the divisions became clear. It also confirmed that the entire English army did not go to Berwick but was in several divisions that crossed the border at different points.
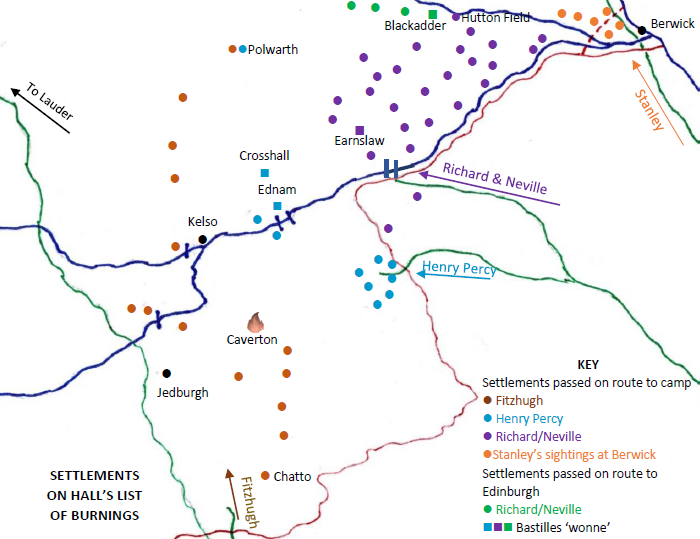
Settlements on Hall’s Burning List
All four of the central divisions needed to cross major rivers – the Tweed by Richard and Neville at Wark, by Henry Percy at Sprouston and by Fitzhugh west of Kelso. Fitzhugh also needed to cross the Teviot at the Nisbets. No bridges were available, so fords had to be used.
How do we know where the ancient fords were? Fords are sometimes marked on maps – for example the Wark fords are well known and still used today. Sometimes fords can be determined when roads go down to a river on one side and re-emerge on the other side.
The map indicates the fords across the Tweed at Sprouston where Henry Percy’s division crossed. Two roads are shown on the south side of the Tweed and they emerge again on the north side of the river (the distance between the fords is about 1000 yards).
The map shows the 64 settlements with different colours for the different divisions.
In Roxburghshire, the map shows a cluster of settlements near the Yetholms and others on a line to the Sprouston fords and on to Polwarth, the most northernly settlement on Hall’s list in Roxburghshire. This indicates that, as in 1480, Henry Percy crossed the border at the Yetholms, then turned north and stopped at Polwarth, which was his campsite. It also shows a line of settlements from south Roxburghshire that lead to fords across the Teviot and the Tweed, indicating that there was a division to the west of Henry Percy. That could only be Fitzhugh and his men who joined Henry Percy’s division at Polwarth.
In Berwickshire after crossing the Wark fords, Richard and Neville’s divisions rode through Berwickshire. The map shows that the settlements are spread out south of Whiteadder Water. There is a cluster on the north bank of the river near Berwick that would have been visible to Stanley’s division, and a line going north east from Hutton Field (in green) that could indicate the route to Edinburgh. The map agrees with the order of march given in Hall’s Chronicle. Richard and Neville almost certainly used the same camp site at Hutton Field where Richard camped in the 1480 raid, a plateau above Whiteadder Water. Hutton Field fits the description of Richard’s camp in the list of knightings on 24th July 1482. The place was described as ‘in Scotland, near Berwick’ and Hutton Field is just under six miles from Berwick. The list of knightings makes it clear that the did not take place at Berwick.
When during the campaign did the ‘burnings’ happen? They could have happened either as the army crossed into Scotland on their way to their campsites, or after they left their campsites to travel to Edinburgh. Hall’s Chronicle says that the settlements were ‘burnt’ after the army had taken Berwick Town on their way to Edinburgh and this has generally been followed by historians.
As well as the routes of the divisions, the map shows that the settlements must have been in the path of the army just after they entered Scotland and before they camped. The settlements in south Roxburghshire on Fitzhugh’s route must have been ‘burnt’ by Fitzhugh’s men after crossing the border and travelling north. It is not feasible that the English army rode over 30 miles to ‘burn’ small settlements such as Chatto before turning north to Edinburgh. Similarly, why would Richard and Neville’s men ride back towards Wark and Henry Percy’s mem back to the Yetholms? The map shows that whatever happened to the settlements on Hall’s list, it happened after the divisions crossed the border and before they reached their campsites. The map also shows that Polwarth, the most northerly settlement in Roxburghshire on Hall’s list, was the objective for Henry Percy and Fitzhugh and where they made camp. Why did Henry Percy not take the shorter route to Hutton Field with Richard’s divisions? There was a strategic reason. At Polwarth, Henry Percy and Fitzhugh were close to Lauder, the traditional muster place of the Scottish army and in position to keep an eye on what was happening.
Having identified the routes and campsites, what happened to the 64 settlements in Berwickshire and Roxburghshire needs to be considered. Was Hall correct? Did the English army burn 64 settlements or did something else happen? There is doubt about precisely what was ‘burnt’ by the English army. The English divisions were moving quickly so how did they find time to burn 64 settlements? The most likely answer is that they did not – they only attacked those that were essential.
Among the settlements mentioned in Richard’s section of Hall’s list is ‘Mykyll Swynton and the Bastile’ (mykyll is a misspelling of muckle the Scots for big). Its Kirk was not just a place of worship but a defensive position on high ground. The remains of a defensive ditch or fosse have been found that indicates that there was a bastille to the west of the Kirk. Muckle Swinton had been the home of the Swinton family for over 400 years. Their badge was a boar which gave its name to the settlement – ‘Swinetown’ – and there are a number of carvings of boars both inside and outside the Kirk. The Swinton tombs can still be seen close to the outside wall of the Kirk.
Because the tombs appear untouched by fire, it has been thought that the Kirk may have been spared because of the presence of the boar symbols and their connection to Richard, but that is not the answer to the lack of burning at Muckle Swinton.
Patricia F Payne’s research has shown that when an English army approached, the Scots took the thatch from their roofs and stacked it at the entrance to their village and set light to it. They also stacked peat around bastille towers and set it alight. Smouldering thatch and peat give off a great deal of smoke. Visualise the scene in Berwickshire and Roxburghshire in July 1482. We see a fast moving, mounted army, who would have instructions to reach their campsites as soon as possible and columns of smoke rising from the villages. It is easy to imagine that the approaching army would have assumed that the village had already been attacked and plundered by others in the army. So they by-passed it, which was exactly what the Scots intended.
Patricia F Payne’s information gives a different perspective on the information in Hall. Whilst the list of settlements is correct, it was not a list of settlements burnt by the English army, but a list of settlements they saw as they travelled north that appeared to be burning. This also explains an anomaly in Hall’s list.
Of the 64 settlements, 58 settlements are simply named, the other six have an additional comment that indicates that they were attacked and that five were taken and one partly burnt. They are:
* The Village of Caverton (Cawarden in Hall’s list) was in the path of Fitzhugh’s march north and was partly burnt.
* The bastilles at Ednam and Crosshall (Crossmaynes) were just north of the Sprouston fords so may have been taken by an advance party from Henry Percy’s division to make sure the rest of the division could cross the fords without harassment from the bastilles. The bastilles were held by men loyal to James III.
* The bastille at Earnslaw (Erneslaw) was in the path of Richard and Neville’s divisions on their way to Hutton Field. There is no strategic reason for this bastille to be targeted unless the men manning the bastille fired on the English troops or it was held by opponents of Albany.
* Polwarth (Long Puolo) was ‘delivered’ by Henry Percy and used as his camp site. This bastille was commanded by James Borthwick, a king’s man, but it belonged to the Hume family who were supporters of Albany. Sir Patrick Hume had been found guilty of treason earlier in the year and his lands, including Polwarth, had been confiscated by James III. Now it was ‘delivered’ back to Sir Patrick.
* Blackadder Tower was owned by the Blackadder family. It guarded the important ford across Blackadder Water that Richard and Neville’s divisions had to cross on their way to Edinburgh and had been reinforced by James III earlier in the year. Goodman says that Albany, with a contingent of men from the English army and help from the Nisbets and other local supporters, destroyed Blackadder Tower and Blackadder House (see research note 7). It was about 3 miles from Hutton Field, so most likely was destroyed during a foray from the campsite at Hutton Field to settle Albany’s feud with the Blackadders.
Hall’s list of ‘burnings’ indicates the route but not what happened to the settlements. The legend has grown that the English army created huge damage and left Berwickshire and Roxburgh in ruins but that was almost certainly not the case. This was not a cross border punitive raid but a military invasion of a large army intending to fight a battle to put Albany on the throne. The last thing Albany would have wanted was to damage a large area of his future kingdom, particularly one where so many of his supporters lived.
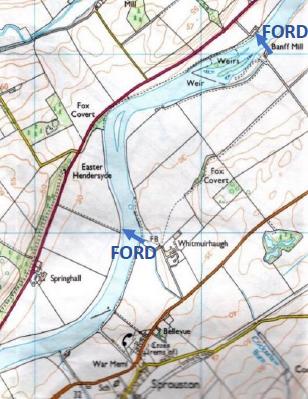
Sprouston Fords (Ordinance Survey)
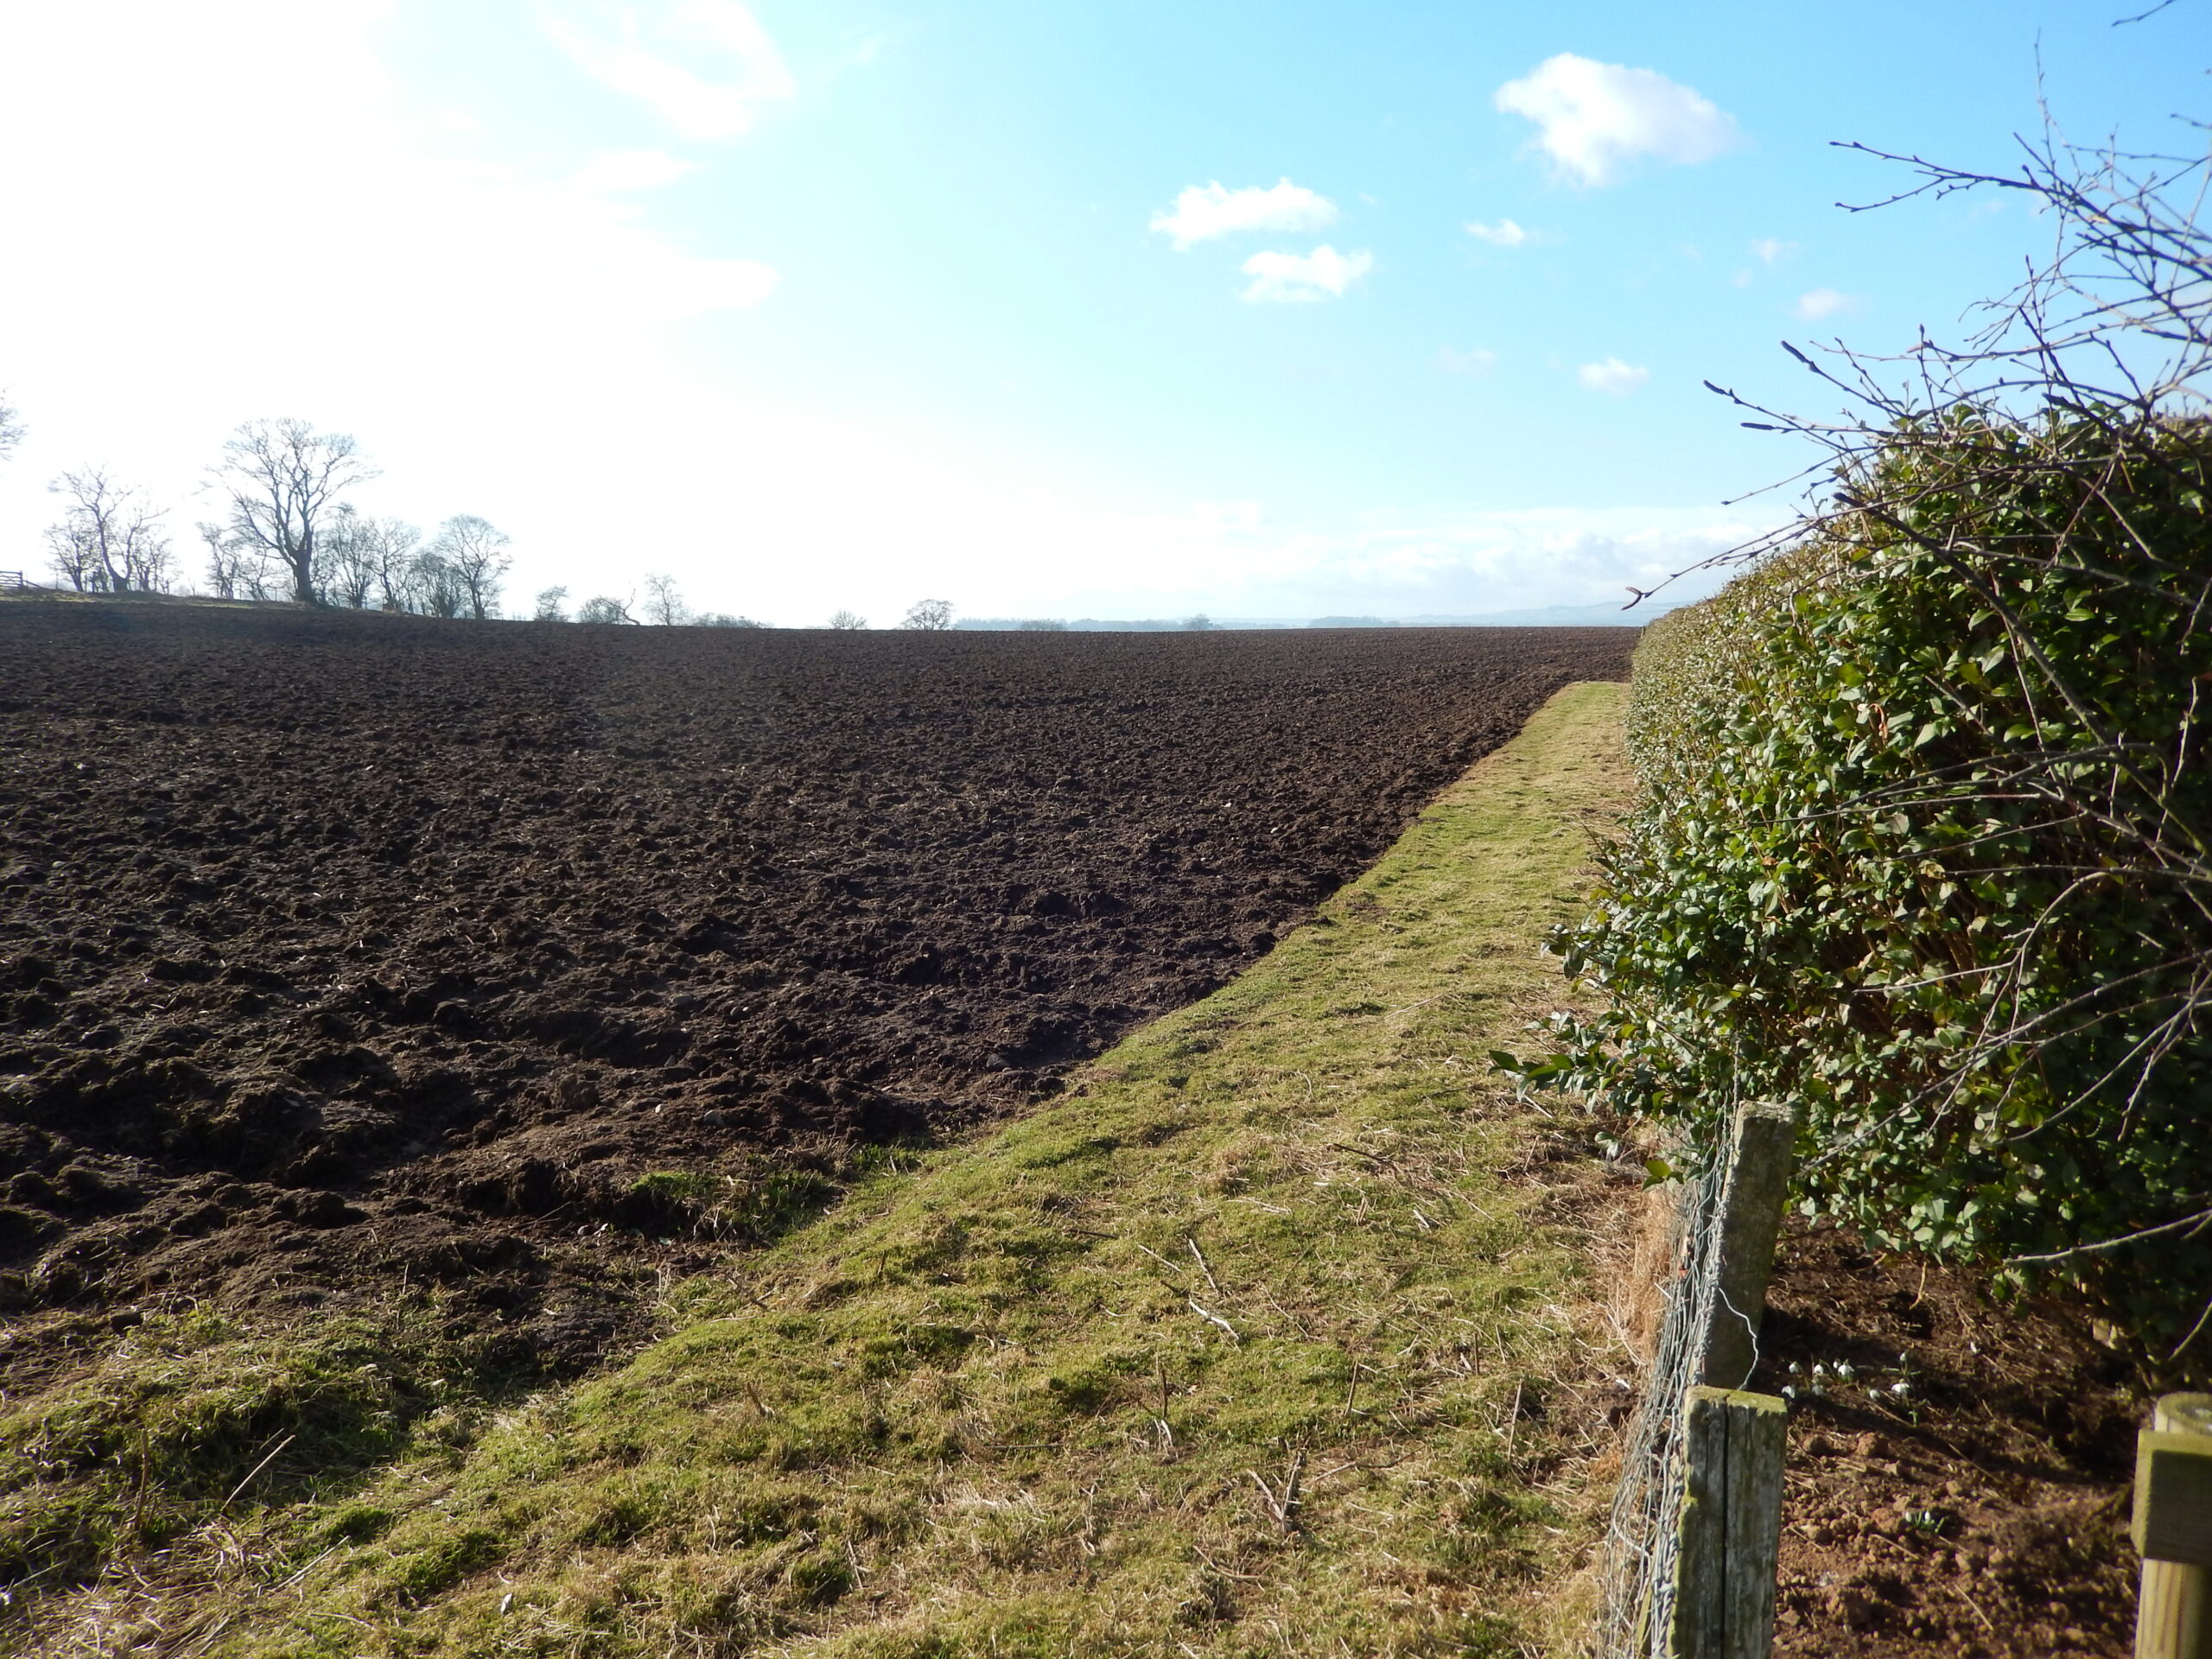
Hutton Field (S Pendlington)

Swinton Kirk Boar (S Pendlington)
The Scottish army march to Lauder
With Stanley successfully occupying Berwick town and laying siege to the castle and Richard and Henry Percy’s men camped in advantageous sites, it is time to look at the Scots. We left the men from the north and west in Edinburgh preparing to march south to Lauder, where the men from the borders were mustering.
The army, with the King at their head, left Edinburgh for the two-day journey to the muster at Lauder. Leaving on about 19th or 20th July, they camped overnight on Soutra Hill.
They arrived at Lauder on either Saturday 20th or Sunday 21st July with the intention of facing the English in battle. The following day events took an unexpected turn.
According to Macdougall (p 196), travelling ahead of the army were two northerners George Gordon, Earl of Huntly, and his kinsman, James Ogilvy. By the time the Scottish army reached the muster point, they were seven miles south of Lauder at Redpath, a settlement owned by Huntly. There they conferred with Sir Alexander Hume of that ilk. Huntly and Ogilvy were among the opponents of Thomas Cochrane, the most important ‘common favourite’. Huntly wanted the earldom of Mar that had been given to Cochrane by James III after the death of his brother John. Hume was also in dispute with James III, arguing that lands in south east Scotland should belong to the Humes. He was an important supporter of Albany. Macdougall says that it was likely that Huntly and Ogilvy were seeking information about the whereabouts and strength of the English army from Hume who would be in touch with Albany. It is also likely that Hume informed then that a large invasion force had crossed the border into Roxburghshire and Berwickshire under the command of Richard, Duke of Gloucester, and that Berwick town was in English hands. Huntly, Ogilvy and Hume then rode to Lauder where the Scottish army was now camped and informed the Scottish lords who had previously expressed their grievances about the ‘black money’ and the ‘common favourites’.
The intention of James III to fight a battle in Berwickshire was unusual. Since the 14th century, Scots had not attempted to face an English army in Berwickshire, The success at Bannockburn north of the Firth of Forth in 1314 and the disaster of Haildon Hill in Berwickshire in 1333 had taught the Scots that it was best to draw English armies north of the Firth of Forth, extending their supply lines and using guerrilla tactics to make retreat more difficult. The decision to fight near Lauder would have already been causing disquiet among the Scottish lords and the news brought by Huntly, Ogilvy and Hume heightened their concern.
On the morning of 22nd July, several Scottish lords met in Lauder Kirk. Chroniclers provide lists of the nobles who were at Lauder, including James III’s Stewart half uncles and representatives of the church and the nobility. Macdougall describes the various complaints the lords had against the King – his handling of the currency, the ‘common favourites’ and in all probability, issues important to one or another of the lords. he goes on to say, that apart from their individual concerns,
‘in the short term, they could all agree on one thing; the King had to be saved from his apparent desire to meet Albany and Gloucester (Richard) in the field and the likely consequence of a pitched battle.’ (p 197)
Macdougall sees Richard as ‘much more formidable’ (p 194) than Edward IV as a military leader. The lords did not want to face a large English army commanded by someone who they knew, from their experience of border raiding, to be a competent general.
Exactly what happened next is not known but the nobles captured James III, and hurriedly took him to Edinburgh where, on 24th July, he was imprisoned in the castle. Legends surround the fate of the King’s ‘common favourites’. The most well-known story is usually called ‘the belling of the cat’ – the capture of the ‘common favourites’ and their hanging at Lauder Bridge. Certainly some of the ‘common favourites’ were killed, including Thomas Cochrane, but there are doubts about the others. In most accounts, the Scottish army was then sent home, the southern contingents leaving as they came and the northern contingent returning over Soutra. Part of the army may have headed for Haddington and waited there
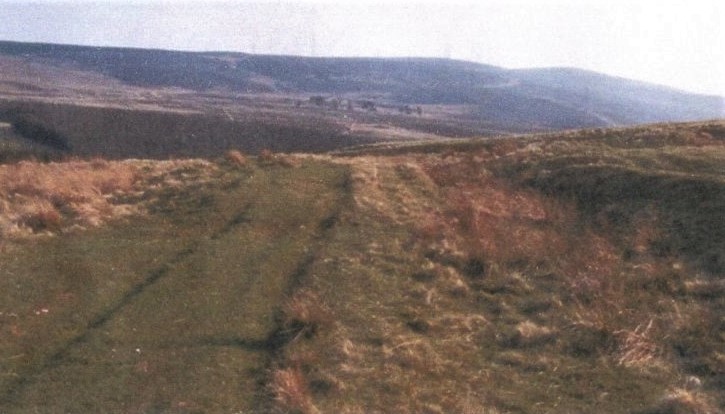
Old Road over Soutra (D Santiuste)
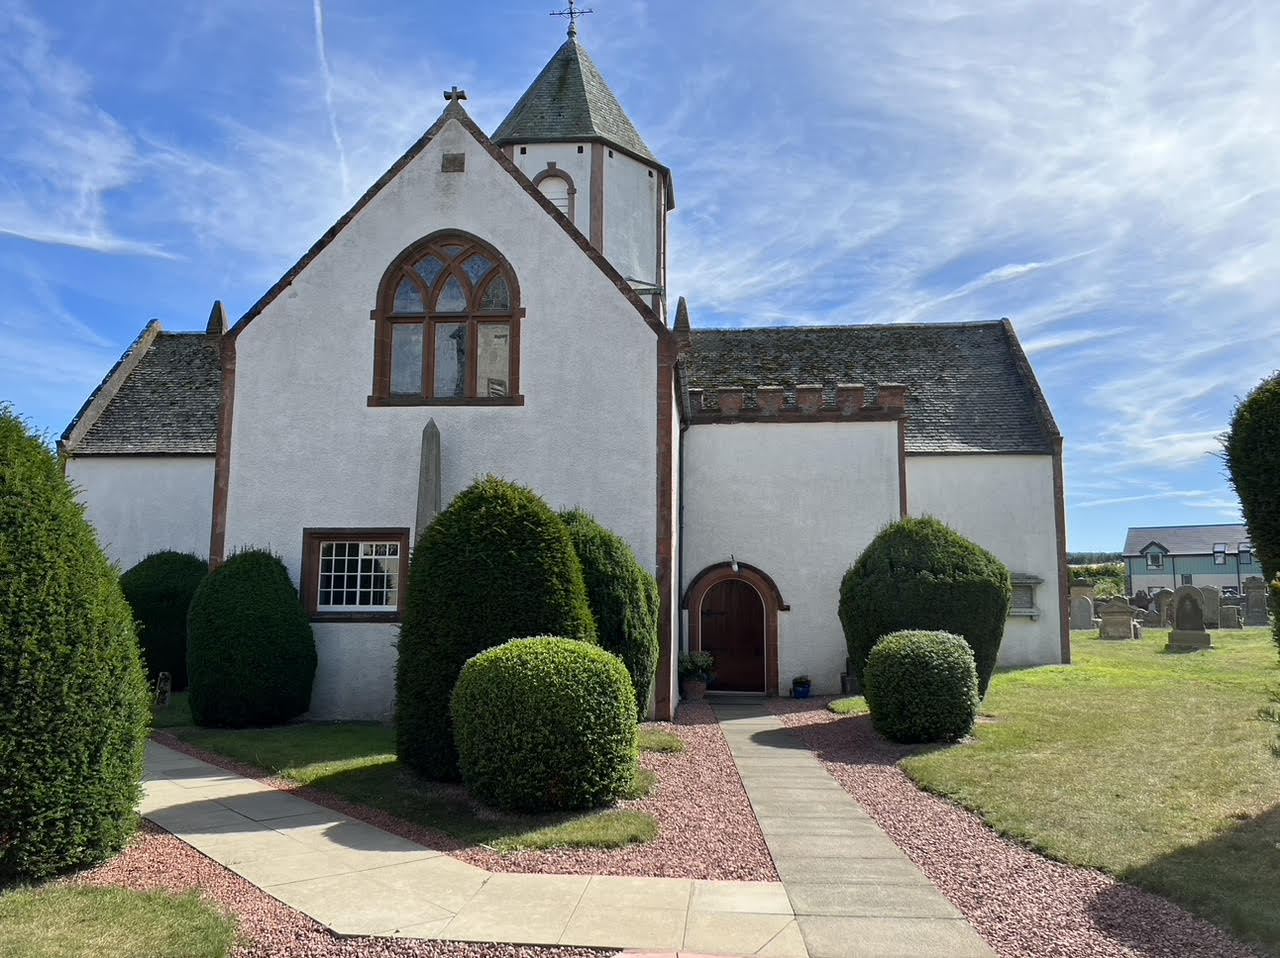
Lauder Kirk (S Potts)
The English response to the news from Lauder
Albany’s men with the Scottish army had been involved with the coup and it would not take long to inform Henry Percy at Polwarth what had happened. Richard would have been informed soon afterwards – it was a matter of 2 or 3 hours to reach him at Hutton Field. Richard’s well laid plans of a swift entry into Scotland and defeating the Scots in battle had been shattered. He must have known that there was now no possibility of winning the war by battle and had to make the best of the situation. Richard had a choice – to stay in south east Scotland besieging Berwick Castle or to march to Edinburgh. he must have known it would have been impossible to put Albany on the Scottish throne but perhaps it would be possible to restore Albany’s position and get his lands back and force the surrender of Berwick Castle. Richard decided to do both. Stanley’s division would continue the siege of Berwick Castle and the rest of the army would go to Edinburgh.
On Wednesday 24th July, (St James’s Eve) Richard summoned his divisional commanders to a council of war at Hutton Field to thrash out the new plan. We know that Henry Percy and Stanley joined Richard and Albany at Hutton Field because all four took part in a large knighting ceremony on that day (see research note 8). The event and the names of the new bannerets and knights were recorded by John Writhe, Garter King of Arms. Knighthoods were usually awarded after battles, but this ceremony probably took place both as a reward for being part of the invasion and an enticement to continue to Edinburgh. Fitzhugh and Neville were not involved in the knighting ceremony – they had both been raised to knight banneret in 1480 – but must have been there.
To Edinburgh
The question of which route the English army took to Edinburgh has always been difficult to answer. None of the Chroniclers give any information about this. Hall’s account of the events is incorrect. He does not mention the happenings at Lauder and instead says that James III did not have confidence in the loyalty of the common people and that he had even less trust in his nobles, so he voluntarily shut himself up in Edinburgh Castle so he would be out of danger. That is clearly incorrect, James was imprisoned by his nobles.
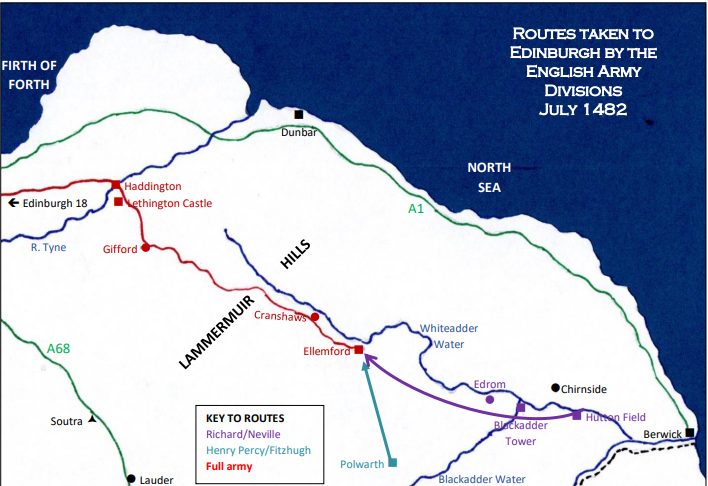
Route taken to Edinburgh by the English army divisions, July 1482
Most historians assume that the army went up the coast road. Some historians are not sure which route Richard took. Macdougall says, ‘Most likely he moved up the coast‘ (p 198) and Hicks says ‘Probably he took the coast road via Dunbar’ (p 271). However, it is extremely unlikely that Richard led the army up the coastal route because there were serious problems with the terrain. Patricia F Payne, who lived in the area, described the tortuous route across Coldingham Moor and the ford at the bottom of a deep defile where the Pease Burn flowed under the guns of Cocksburnpath Tower and Dunglass Castle (see research note 9 for a full description of the problems with the coastal route).
If the coastal route was not used, then one of two inland routes must have been used – the road over Soutra directly into Edinburgh or a route over the Lammermuir Hills to Haddington and then along the main road to Edinburgh. The Scots must also have used one of them to escape north. The Scots were camped at Lauder which is due south of the road over Soutra. The English were camped at Polwarth and Hutton Field south of the road over the Lammermuirs.
The whereabouts of the Scottish army need to be considered. With no prospect of winning booty in battle and harvest time approaching, the Scots would want to get home as soon as possible, avoiding the English army as they did so. The men from the north would have taken the quickest and most direct route to Edinburgh – back over Soutra. It was also the safest being west of the English encampments. Some Scottish nobles and their troops may have retreated to Haddington (see research note 9 for a full discussion of the routes taken by the armies).
Macdougall says that Richard and the army arrived between 31st July and 2nd August. Sutton gives 31st July as the day the army entered Edinburgh. This means that, if the army left their camp sites on 25th July, the day after the knightings, they had seven or eight days to travel to Edinburgh. The Scots took two days to reach Lauder on the route over Soutra and even allowing for the Hutton Field divisions to reach the road, the timing does not make sense. Almost certainly the route over the Lammermuirs was the one chosen by the English commanders on Albany’s advice. The four divisions headed for Ellemford at the foot of the Lammermuirs, which was fifteen miles from Hutton Field and six miles from Polwarth.
This was friendly country, where men owed allegiance to Albany. The area around Ellemford was owned by John Ellem, who had been Albany’s captain at Dunbar Castle during the siege laid by James III against Albany and had been punished by the Scottish parliament for his support of Albany.
From their camp at Polwarth, Henry Percy and Fitzhugh’s divisions had the easier journey across fairly flat countryside and no major rivers to cross. They headed for Ellemford where they met the Richard and Neville’s divisions coming from Hutton Field.
After leaving their campsite, Richard and Neville stayed south of Whiteadder Water, a significant river that twists and turns through the area from west to east, avoiding the many loops of the river. Shortly after leaving Hutton Field, Blackadder Water, flowing from the south to join Whiteadder Water at Allanton had to be forded. The photograph shows the confluence of the two rivers near Allanton.
After fording Blackadder Water, they rode past Whitmire, Edrom and Broomhill, settlements also on Hall’s ‘burnings’ list and on to Ellemford.
With the four divisions of the army fully assembled they were ready to cross the hills. Stanley’s division remained at Berwick bombarding the castle, so it was unlikely that the main army took artillery with them.
From Ellemford the road goes north west through the beautiful valley of Whiteadder Water and then climbs over the Lammermuir Hills to Haddington – a distance of 19 miles.
The Lammermuirs are mostly heather moorland with turf much like the terrain of upland Yorkshire and Northumberland, so would not present much of an obstacle to Richard’s northerners. One major advantage of this route is its proximity to an abundant supply of water, and some fish to supplement the soldier’s diet.
On the northern side of the hills the road passes through farmland and just over a mile before Haddington on the left of the road is Lennoxlove House and a large flat field to camp.
The photograph shows the current Lennoxlove House. In 1482 only the Castle, known as Lethington Castle, on the left of the building in the photograph, was there.
The total journey from Hutton Field to Haddington was about 34 miles, a few miles less than the coast route. Allowing for crossing the hills the army would have taken no more than 2 or 3 days to cover the 34 miles so Haddington would have been reached by 27th July.
At Haddington, Richard and Albany probably began negotiations with the Scottish lords. It very soon became clear to Richard that Albany would not be accepted as King with Edward IV as overlord. The negotiations then dealt with the return of Albany’s lands and his status as the King’s brother. A verbal agreement to return Albany’s lands to him was probably firm enough to satisfy both parties, and the army and some Scottish nobles rode to Edinburgh on 29th July. The army entered the city unopposed and camped on the Burgh Muir.
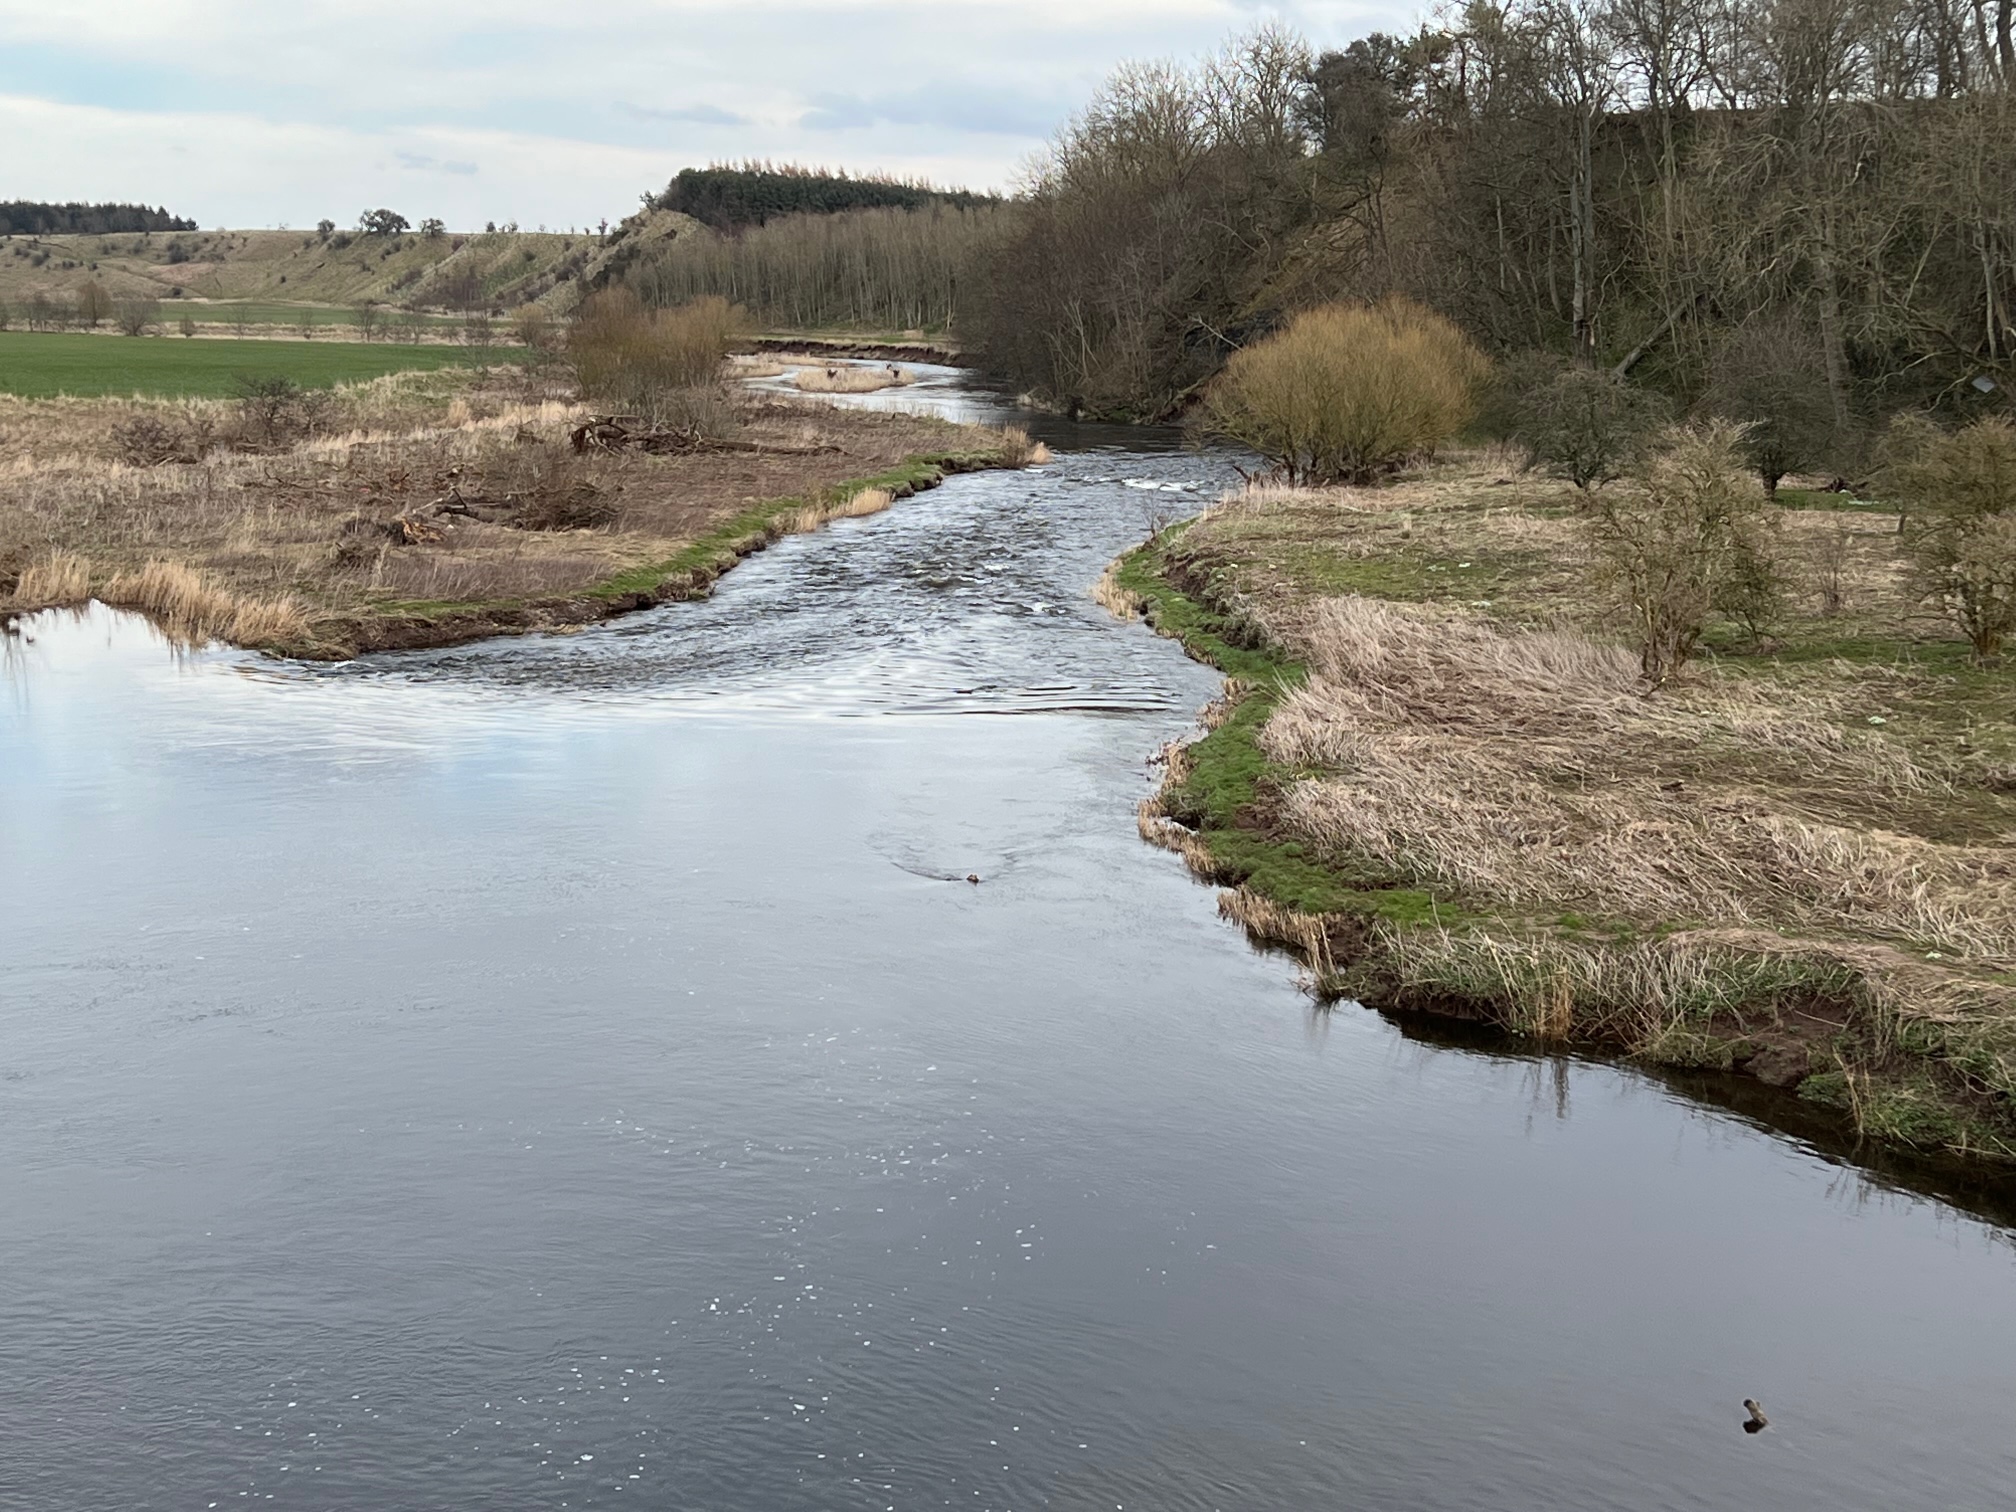
Ford at Blackadder Water (S Potts)

Whiteadder Water at Ellemford (S Potts)
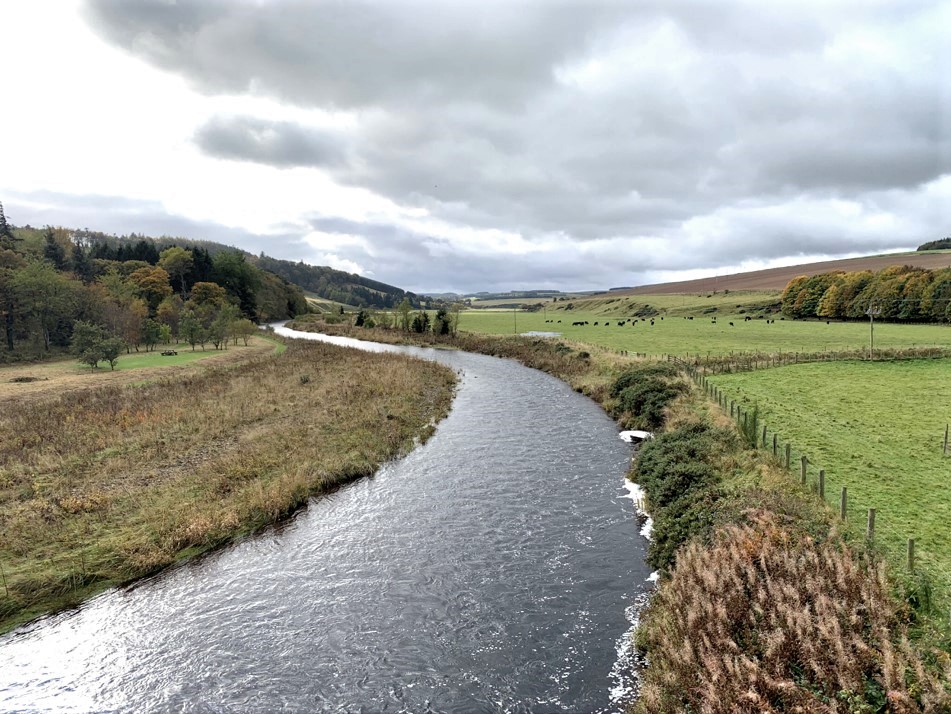
Whiteadder Valley (M Macleod)

View from the top of the Lammermuirs looking north towards Haddington (M Macleod)

Lennoxlove House (Lethington Castle) (M Macleod)
Edinburgh
It may have been part of the agreement that Edinburgh would not be burnt nor its citizens harmed in return for its surrender. As with Berwickshire and Roxburghshire, Albany would not have wanted Edinburgh damaged or its citizens hurt. Rules of war usually meant that towns that surrendered were spared but there are examples throughout history of that not being honoured. The English army had not had a chance to plunder a battlefield and to deny his men the chance to plunder Edinburgh was not an easy task for its commander. In the event, Richard’s control of the army was such that no citizen of Edinburgh nor any property was harmed.
On the entry to Edinburgh, Garter King of Arms, John Writhe, made a proclamation from Richard at Mercat Cross proclaiming the City for Edward IV. Richard had numerous problems to deal with. James III was still a prisoner in the castle and some of the Scottish nobles were with him, so there was no one in authority to deal with. In addition, he only had enough funds to support the army until the second week of August, so by then he must be back at Berwick to discharge the army. On 2nd August the agreement between Albany and representatives of the Scottish lords and church was concluded. Albany was granted a full pardon for his previous treasons – the fact that the King was ‘unavailable’ to grant the pardon was ignored. Albany promised to give James III his true faith and allegiance and his lands and status were restored.
Hall reports that on 3rd August Albany thanked Richard for ‘hid great labour’ in restoring his lands, and Albany said that he intended to keep the promises that he had made to Edward IV at Fotheringhay. Macdougall suggests that Albany, who was facing an uncertain future, was keeping his options open. Whether this is true or not we will probably never know, but it was in Albany’s character to pledge his allegiance to his King one day and secretly tell Richard that he was not going to honour it the next day. In fact he rebelled against James III by the end of the year and was forced to flee to France again.
One final problem had to be solved – the question of Princess Cecily’s dowry and marriage to the Scottish heir. This issue had been one of the causes of the war and was a particular grievance of Edward IV. Understandably the City Fathers were anxious that the English army left Edinburgh as soon as possible and negotiations took place between them and Richard about the dowry. A second agreement was concluded between Richard and the City Fathers on 4th August. In the agreement, the City Fathers agreed that Edward IV would have the choice of going ahead with the marriage or not. They also agreed that they would repay the dowry money to Edward IV if the marriage did not go ahead.
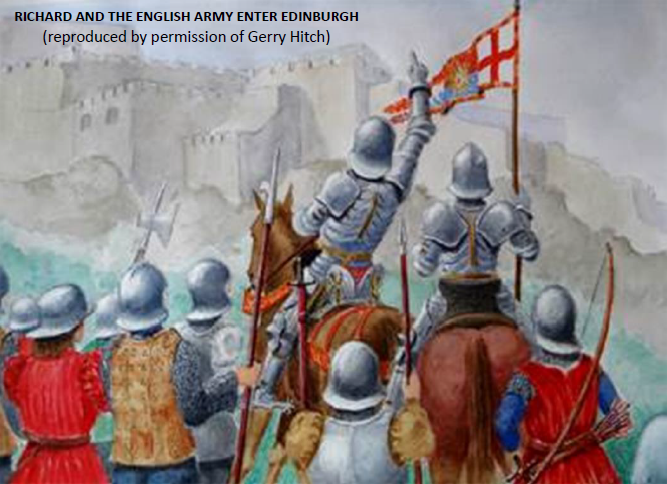
Richard and the English army enter Edinburgh (reproduced by permission of Gerry Hitch)
Return to Berwick
After that the English army left Edinburgh and returned to Berwick without Albany who remained in Edinburgh. It is likely that they returned the way they had come, crossing the Tyne at Haddington and over the Lammermuirs and then on to Berwick via Chirnside, a distance of 55 miles in total.
In the meantime, Albany and the Scottish nobles had received messages from the Scots besieged at Berwick Castle asking for help. Hall gives a full description of what happened and Leslie, the Scottish Chronicler writing in 1578 also comments. Hall says that on 9th August, Albany announced his intention to drive the English out of Scotland and raise the siege at Berwick Castle. He ordered the Scots to re-muster at Cranshaws, a settlement on the Lammermuir Hills 22 miles from Berwick. Sutton says that Albany was encouraged to betray his English allies by Scottish lords, presumably those who had rebelled at Lauder. Albany was in a difficult position, it was essential to prove his loyalty to the Scots, so he made the proclamation. However, he wanted to reassure the English so he wrote to Richard saying that if Richard would end the siege of Berwick Castle and leave it in Scottish hands, he would keep his other promises in the agreement with Edward IV.
By this time Richard and his men were at Berwick. Leslie says that the castle had been strongly defended by the 500 Scots under the command of Sir Patrick Hepburn and many English men had been killed. This may have been somewhat biased because Hall does not mention deaths among Lord Stanley’s division. Leslie also says that Hepburn had sent several messages to the Scottish lords asking for help. Leslie’s account confirms the muster of the Scottish army on the Lammermuirs saying that they arrived suddenly at Cranshaws. This may have been the remnants of the Scottish army who were camped near Haddington.
At Berwick, the time when wages for the English army would be paid passed, so most of the army had dispersed, but Richard still had 1700 men with artillery besieging the castle. Richard, who was obviously annoyed at Albany’s duplicitous behaviour, replied to Albany in no uncertain terms that it would be dishonourable for him to end the siege of the castle. He reminded Albany that he, Albany, had been Edward IV’s counsellor and partner in the venture. Richard went on to say that he would not betray his brother Edward IV, who had shown Albany much kindness to help him return home to Scotland and had borne the costs of the invasion. Furthermore, Richard gave his word as a prince that if the Scottish army attempted to raise the siege, he and his army would defend the besiegers, or else die in the fight.
At that point the Scottish lords, who realised that if they tried to raise the siege Richard would fight stepped in to continue the negotiations. If they lost, their power in Scotland and Berwick would be lost. If they won, they would have only gained the ‘poor’ town of Berwick and would probably face a new English invasion. They tried to bargain with Richard, giving him two options – either leave the situation as it was with the town in English hands and the castle in Scottish hands or destroy both town and castle. The message was delivered in person by the senior Scottish herald, Lyon King of Arms. Richard replied that he would not leave until Berwick Castle was surrendered or taken by force or his army was defeated, nor would he listen to any more Scottish petitions.
Lyon King of Arms returned with the news and the Scottish lords realised that the only way to avoid war was to surrender Berwick Castle. Leslie says that seeing the divisions between the factions in Scotland, and the army not able to raise the siege, Richard and the Scots agreed upon certain conditions of peace. A truce was declared until 11th November 1482 and, on 24th August, Hepburn and his men were allowed to leave Berwick Castle unhindered. Richard and his men marched in and took possession of the Castle and Berwick has remained in English hands ever since.
The news reached London very quickly and on 25th August Edward IV wrote to the Pope describing the invasion of Scotland, praising Richard’s ability as a commander and the success of the invasion. There was much rejoicing in England. The University of Cambridge, where Richard was held in high esteem, held a procession through the town to celebrate his victory over the Scots.

Surrender of Berwick Castle (in public domain)
Conclusion
Critics of Richard III see an out-of-control army burning their way through the Scottish countryside. There are indications that the truth is much more like what happened in Edinburgh, where Richard had such a strong hold on the army that no citizens or properties were hurt or damaged. Views of historians about this fall into one of two categories. One group puts the blame on Richard and his lack of planning. After the accession of Henry VII, the medieval chroniclers such as Croyland and Polydore Vergil, accused Richard of leading an expensive failure and wasting the Scottish countryside. Berwick was seen as an expensive acquisition that had no benefit to England. The Tudor Chronicler, Hall, is complimentary about Richard, saying that he ‘like a wise counsellor, took his advantage when it was offered’ (p 335). Modern historians, like Grant and Seward, condemn Richard as showing poor political judgement. Other modern historians, such as Macdougall and Cunningham, say that he made the best of the situation, adapting to the changing situation and getting the best possible outcome in the circumstances.
From a military strategic point of view, there seems nothing wrong with the way the plan was carried out. Like the Dumfries raid, Richard moved his divisions quickly into place even though this was a much larger enterprise and required significant planning to achieve surprise. Co-ordinating the divisions in the initial stage was not easy at a time when communication was by ‘pony express’. It required the divisional commanders to follow the plan exactly and to have confidence in Richard’s leadership. It also required Richard to have confidence in his commanders. He needed to be sure they would not cross the border too early or too late and that they had control of their men so that they moved quickly without stopping to loot and burn on the way.
Like all military plans, trust between the commander of the army and his four divisional commanders was essential. This was particularly the case when his divisions were spread out and acting independently. Understanding of the plan was necessary throughout the command structure, from individual lords leading their retainers, down to captains of the mercenary troops from Europe and captains of men from towns and cities in England. Men like John Brackenbury who led the men of York, would have known and understood the plan. When the plan changed after the events at Lauder, the divisional commanders, who were present at the council of war, would have informed their captains before setting off to Edinburgh.
Looking at what happened shows that Macdougall and Cunningham are probably correct. What is clear is that Richard’s command of the army and his leadership of his commanders was efficient and adaptable when new plans were required. He moved the different divisions quickly across the border to create maximum surprise. The invasion would probably have succeeded if the Scots lords had not removed the King. It seems obvious that the English invasion plan was thwarted by the Scottish lords who removed James III from the scene and dismissed the army.
Critical chroniclers and historians fail to ask some important questions. First, would Edward IV have succeeded in putting Albany on the throne of Scotland? Almost certainly not. Second, what else was possible in the situation? A retreat to England or an extended siege of Berwick. They also fail to consider the terrain and the military strategy in detail. This leads them to make errors in the timeline. Some ignore the burnings and others ignore the knighting ceremonies. It is only possible to see the full picture when both events are included and the settlements are plotted onto a map.
This was Richard’s first command of an army, one of the larger English medieval armies to invade Scotland. He commanded his divisions well, was adaptable to changes in circumstances and brought his men back to England with few casualties. the 1482 invasion of Scotland could be described as Richard’s greatest military achievement.